Disclaimer: The purpose of this toy project is to learn the fundamentals of APIs, not to build a production ready web application. We will use JWTs without refresh tokens and store them inside localstorage – But we know it is bad practise, and to implement a more secure approach is out of the scope for this guide.
Advice: Use LLMs and search engines to expand on topics and do more research, or if you just get stuck on a command.
Some of the technologies we will use:
API?
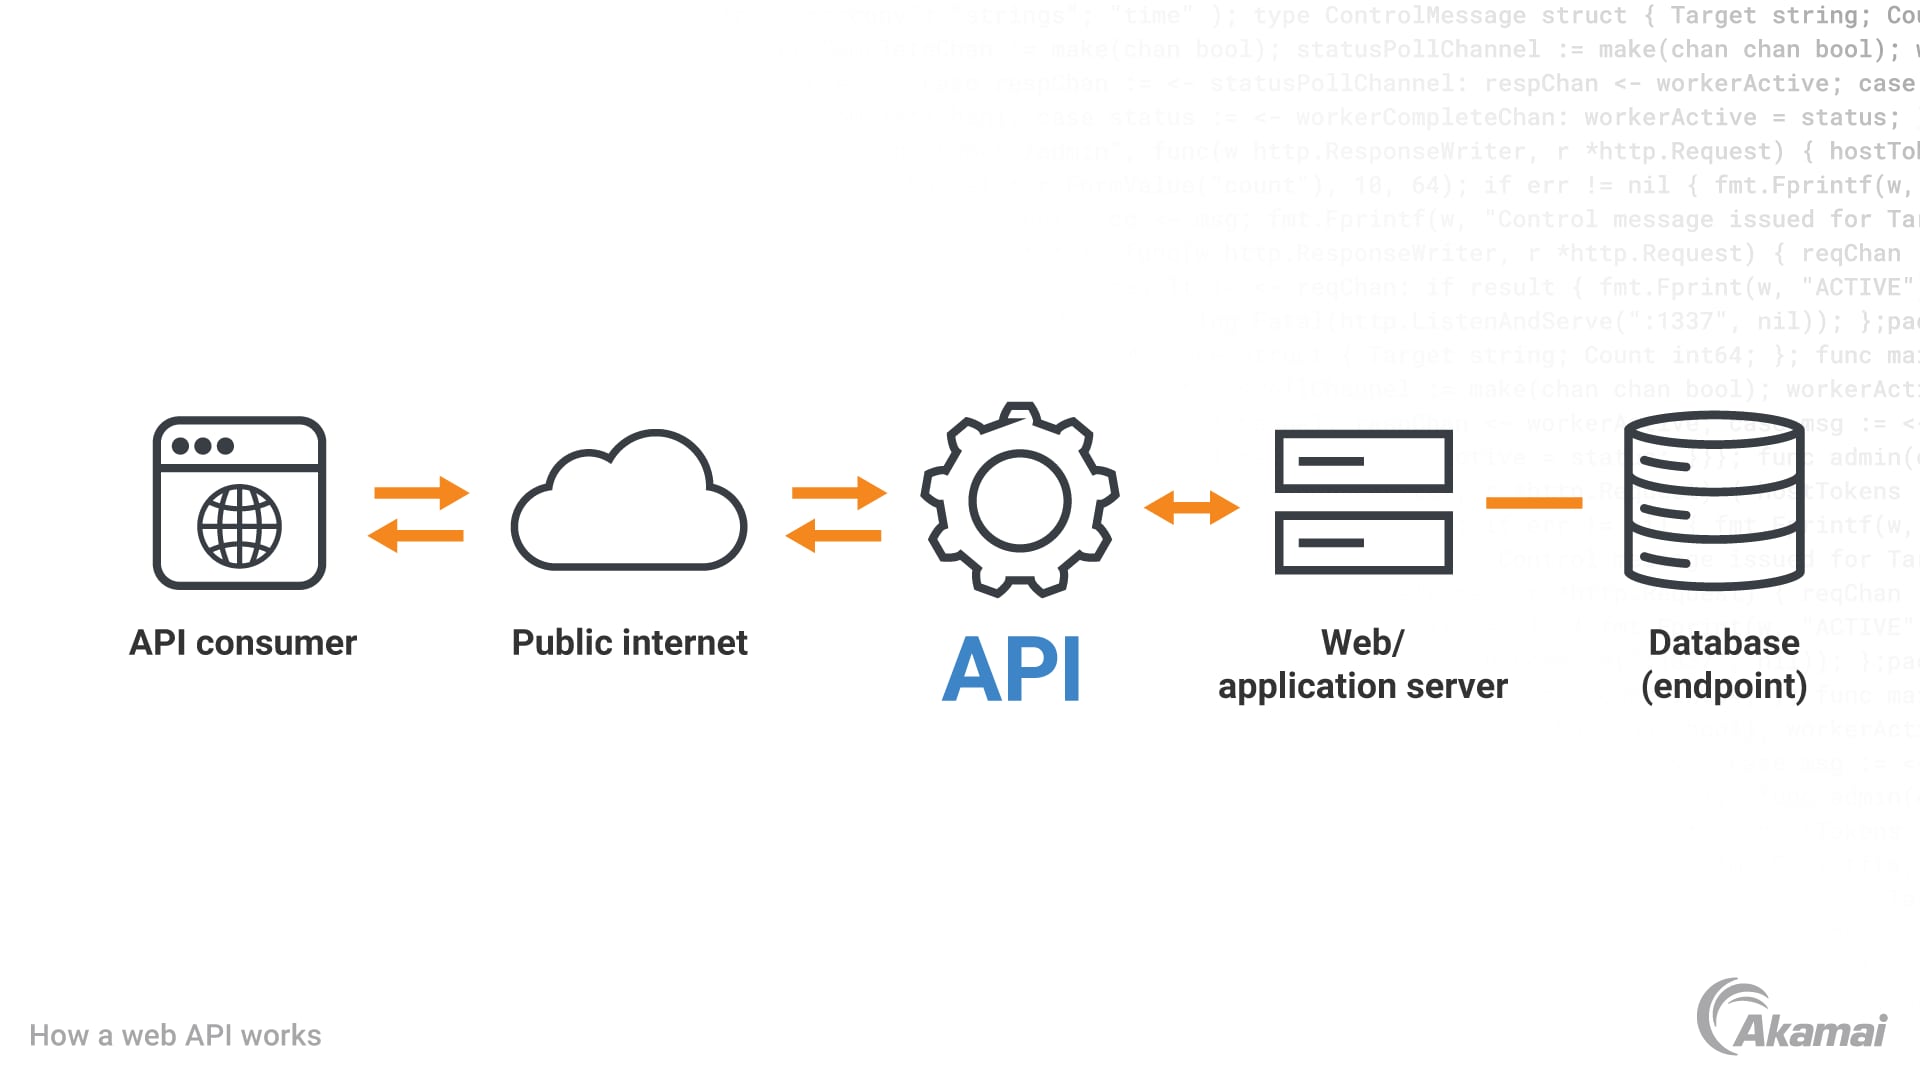
API stands for “Application Programming Interface” and is what we use to communicate with other applications. Most large scale web application such as Google and Meta have their own APIs.
Through these APIs we can interact with the underlying web applications. The developers of these underlying web applications choose what functionality and data they want to expose, and how, which then let other developers like us interact with it in a structured, and hopefully documented way.
APIs use the Server-Client architecture, having the client (browsers, native applications, or other web applications and software) use the server (that serves the API).
Let’s do a quick example of an API request. We use an API for random users: https://randomuser.me/. Paste the following code into your browsers console and press enter:
let result = await fetch("https://randomuser.me/api/");
let json = await result.json();
json.results[0];
This will fetch a random user and print the result, and that’s how easy it can be to consume an API.
{
  "gender": "female",
  "name": {
    "title": "Ms",
    "first": "Shraddha",
    "last": "Acharya"
  },
  "location": {
    "street": {
      "number": 123,
      "name": "Unknown Street"
    },
    "city": "Patiala",
    "state": "Bihar",
    "country": "India",
    "postcode": 52659
  },
  "email": "shraddha.acharya@example.com",
  "login": {
    "uuid": "c0dd02b1-7d95-4ad7-866f-05f58816588a",
    "username": "yellowbear416",
    "password": "gladiato",
    "salt": "2MvN1BVA",
    "md5": "5c08ed83bbe5900bf7357c347601f779",
    "sha1": "b5f07c04fee266404fcd34136a6343eb83dd51c8",
    "sha256": "49ee4ac1129e22e04c84ed01711af5c2c77186ea88292a9dbf01c6f0b3fe2a6f"
  },
  "dob": {
    "date": "1997-12-07T15:27:17.841Z",
    "age": 27
  },
  "registered": {
    "date": "2009-06-26T05:27:18.844Z",
    "age": 16
  },
  "phone": "8043556361",
  "cell": "9396809804",
  "id": {
    "name": "UIDAI",
    "value": "889362812163"
  },
  "picture": {
    "large": "https://randomuser.me/api/portraits/women/53.jpg",
    "medium": "https://randomuser.me/api/portraits/med/women/53.jpg",
    "thumbnail": "https://randomuser.me/api/portraits/thumb/women/53.jpg"
  },
  "nat": "IN"
}
Now you made your first API request, congratulations!
In this guide we will both implement our own API using the JavaScript library express and also interact with a third party API from 46elks.se to create a “web-phone” application.
To make things a bit more interesting we will usa a decoupled architecture, meaning the client and API will be running on two different ports.
Project description:
This application is a “web-phone”, a simple web application with simple phone functionalities like storing contacts, sending SMS, and making phone calls.
Users will be able to sign up and create a phone book with their contacts, then make phone calls, and send SMS with help of a third party API provided by 46elks.
To follow along you need credits at 46elks.se. You can contact them and ask for some.
Project structure:
To create a decoupled application we more or less need two applications, one for our backend logic (API), and one for our frontend logic (Client). This is different from the prior architecture (SPA) we used in the recent JavaScript guide, building a toy project.
Using a decoupled architecture comes with its own quirks. For one, handling authentication in a secure manner can be challenging. This is something beyond the scope of this project, do not worry!
Let’s start with scaffolding the project.
I am on a Mac machine, and your shell code might be different:
# create the top-level project directory
mkdir web-phone; cd web-phone;
# create the api project and set type=module, then change directory to top-level one
mkdir backend; cd backend; npm init -y; npm pkg set type=module; cd ..
# do the same for the frontend
mkdir frontend; cd frontend; npm init -y; npm pkg set type=module; cd ..
Your project should look like this:
├── backend
│   └── package.json
└── frontend
    └── package.json
Next we install the dependencies for our backend and frontend:
# change directory to backend, install dependencies, change directory back to top-level
cd backend; npm i express cors mongodb jose; cd ..
# do the same for the frontend
cd frontend; npm i -D vite; cd ..
Then add some files and directories, your project should look like this:
├── .gitignore
├── backend
│   ├── controllers
│   │   ├── contactController.js
│   │   ├── phoneController.js
│   │   └── userController.js
│   ├── middlewares
│   │   └── auth.js
│   ├── package.json
│   ├── server.js
│   └── services
│       ├── db.js
│       └── jwt.js
└── frontend
    ├── index.html
    ├── package.json
    └── src
        ├── main.js
        ├── contact.js
        └── phone.js
Make sure to include correct directories, files, and extensions in your .gitignore file.
Writing the first lines of backend code:
We begin writing some backend code to hold the express server and supply routes to create users. We also write the first JWT logic to be able to log users in.
Write this code into your server.js file:
import express from "express"
import cors from "cors"
// we import functions from this module that we soon will write
import {signup, login} from "./controllers/userController.js"

const port = 3000
const app = express()

app.use(cors())
app.use(express.json())

// route to create users
app.post('/signup', signup)

// route to login users
app.post('/login', login)

app.listen(port, () => {
  console.log(`API listening on port ${port}`)
})
Each route is using a function imported from the userController.js module, let’s write the logic inside that file:
// import these functions, we will create them in a while
import { userCollection } from "../services/db.js"
import { generateToken } from "../services/jwt.js"

// function to check if email is available
async function emailAvailable(email) {
  let user;
  try {
    // try fetching user from our database
    user = await userCollection.findOne({ email: email });
  } catch (e) {
    console.error(e);
    // if something unexpected happens, throw error
    throw new Error("Database error!");
  }
  if (user) {
    // if user exists, return false
    return false;
  } else {
    // else return true
    return true;
  }
}

// function to signup a user
export async function signup(req, res) {
  // extract the data from the request
  const formData = req.body;
  try {
    // check if email is available
    if (await emailAvailable(formData.email)) {
      // then create the new user
      // we do not use any password encryption for now
      await userCollection.insertOne({
        email: formData.email,
        password: formData.password,
      });
      // return a response with a genereated token
      // we will create the token logic in a while
      return res.status(200).send(
        await generateToken({
          _id: createdUser.insertedId.toString(),
          email: formData.email,
        })
      );
    } else {
      // respond with error message if email is taken
      return res.status(400).send("Email already taken!");
    }
  } catch (e) {
    console.error(e);
    // if everything fails return error message
    return res.status(500).send("Internal Server Error");
  }
}

// function to login a user
export async function login(req, res) {
  // check if user already logged in
  if (req.headers.authorization) {
    // just return without doing anything
    return;
  }
  // extract form data
  const formData = req.body;
  try {
    // try find the user in our database
    const user = await userCollection.findOne({
      email: formData.email,
      password: formData.password,
    });
    if (user) {
      // if user then try return a token
      try {
        return res.status(200).send(
          await generateToken({
            _id: user._id.toString(),
            email: formData.email,
          })
        );
      } catch (e) {
        // else send error message
        console.error(e);
        return res.status(500).send("Internal error, try again!");
      }
    } else {
      // if no user return error message
      return res.status(400).send("Invalid credentials!");
    }
  } catch (e) {
    console.error(e);
    // if everything fails return error message
    return res.status(500).send("Internal Server Error");
  }
}
Now we begin write the logic to our db.js and jwt.js files.
First of all, make sure you have a MongoDB server instance installed and running on your machine. We need this for the mongodb Node client to interact with. To check this on a Mac machine, run the following in your terminal:
# command to list services running through homebrew package manager
brew services list
# output list of all currently running services, there might be more than this one
Name                  Status  User File
mongodb-community@8.0 started vide ~/Library/LaunchAgents/homebrew.mxcl.mongodb-community@8.0.plist
You also need to create a database for the project, I am using mongosh to connect to the running service using the default url:
# command to "jump in" to the database server
mongosh "mongodb://localhost:27017"
# to create a new database
use webphone
# then exit
exit
Then add this to your db.js file to perform a Create operation to the database:
import { MongoClient } from "mongodb"

// set the url to the locally running mongodb instance
const url = "mongodb://localhost:27017";
// initiate the client
const client = new MongoClient(url)
// specify the name of the newly created database
const dbName = "webphone";
// connect to the database server
await client.connect()
// connect to the database
const db = client.db(dbName)
// export the user collection we need to perform CRUD
export const userCollection = db.collection("users")
// export the contacts collection we need to perform CRUD
export const contactCollection = db.collection("contacts")
Add this to your jwt.js file to handle the JWT logic, we are using this package called Jose:
import * as jose from "jose"

// create a secret key to sign our JWTs
// we can also save it to .env file or equal
const secret = new TextEncoder().encode(
    "GIo1kkI927PuvzXu7oBC5XzDdS2HIYRqan2zeEnx5CfJcih9UwfUyUbGUIyufztex"
)
// specify a cryptographic algorithm to sign with
const alg = "HS256"

// function to generate and return a signed jwt-token with provided data
// the provided data in our case is the user _id and email
export async function generateToken(data) {
  try {
    // we try hashing our data and signing it with this function:
    // https://github.com/panva/jose/blob/main/docs/jwt/sign/classes/SignJWT.md
    return await new jose.SignJWT(data)
      .setProtectedHeader({ alg })
      .sign(secret);
  } catch (e) {
    console.error(e);
    throw new Error(
      `Failed to generate token with data: ${data} and error message: ${e}`
    );
  }
}

// function to validate jwt-token
export async function validateToken(token) {
  try {
    // we try to validate the provided token with this function:
    // https://github.com/panva/jose/blob/main/docs/jwt/verify/functions/jwtVerify.md#examples
    const { payload } = await jose.jwtVerify(token, secret);
    return payload;
  } catch (e) {
    console.error(e);
    throw new Error(`Failed to verify token: ${e}`);
  }
}
Writing the first lines of frontend code:
Add this to your index.html file. It will create a simple form to take in user data to register a user. We will later write the JavaScript logic to handle the form submission, sending the data to the backend API.
<!DOCTYPE html>
<html lang="en">
  <head>
    <meta charset="UTF-8" />
    <link rel="icon" type="image/svg+xml" href="/vite.svg" />
    <meta name="viewport" content="width=device-width, initial-scale=1.0" />
    <title>client</title>
  </head>
  <body>
    <div id="app">
      <div id="signup-form-div"></div>
      <div id="login-form-div"></div>
      <div id="logout-button-div"></div>
      <div id="phone-page-div">
        <h1>Phone page</h1>
        <div id="contact-form-div"></div>
        <h3>My contacts:</h3>
        <div id="contacts-div"></div>
      </div>
    </div>
    <script type="module" src="/src/main.js"></script>
    <script type="module" src="/src/phone.js"></script>
  </body>
</html>
Now add this to your main.js file to handle form submission:
// try get token from local storage
const token = localStorage.getItem("token");
// if not any token
if (!token) {
  // setup signup form
  const signupFormDiv = document.getElementById("signup-form-div");
  signupFormDiv.innerHTML = `
  <h1>Sign Up</h1>
  <form action="post" id="signup-form">
    <label for="signup-email">Email</label>
    <input type="email" name="signup-email" id="signup-email" />
    <label for="signup-password">Password</label>
    <input type="password" name="signup-password" id="signup-password" />
    <input type="submit" value="Sign Up" />
  </form>
  <br />
  <hr />
  `;
  const signupForm = document.getElementById("signup-form");
  // attach event listener for form submission
  signupForm.addEventListener("submit", async (e) => {
    e.preventDefault();
    let email = document.getElementById("signup-email").value;
    let password = document.getElementById("signup-password").value;
    // send signup request to server
    const res = await fetch("http://localhost:3000/signup", {
      method: "post",
      headers: {
        "content-type": "application/json",
      },
      body: JSON.stringify({
        email: email,
        password: password,
      }),
    });
    if (res.status === 200) {
      // if successful we store token in localstorage
      const token = await res.text();
      localStorage.setItem("token", token);
      // and reload page
      location.reload();
    } else {
      // else we display error message
      alert(await res.text());
      // and also reload the page
      location.reload();
    }
  });

  // setup login form
  const loginFormDiv = document.getElementById("login-form-div");
  loginFormDiv.innerHTML = `
    <h1>Login</h1>
      <form action="post" id="login-form">
      <label for="login-email">Email</label>
      <input type="email" name="login-email" id="login-email" />
      <label for="login-password">Password</label>
      <input type="password" name="login-password" id="login-password" />
      <input type="submit" value="Login" />
    </form>
    <br />
    <hr />
  `;
  const loginForm = document.getElementById("login-form");
  // attach event listener for form submission
  loginForm.addEventListener("submit", async (e) => {
    e.preventDefault();
    let email = document.getElementById("login-email").value;
    let password = document.getElementById("login-password").value;
    // send login request to server
    const res = await fetch("http://localhost:3000/login", {
      method: "post",
      headers: {
        "content-type": "application/json",
      },
      body: JSON.stringify({
        email: email,
        password: password,
      }),
    });
    if (res.status === 200) {
      // if successful we store token in localstorage
      const token = await res.text();
      localStorage.setItem("token", token);
      // and reload the page
      location.reload();
    } else {
      // else we display error message
      alert(await res.text());
      // and also reload the page
      location.reload();
    }
  });
} else {
  // if user is already logged in, we display the logout button
  const logoutButtonDiv = document.getElementById("logout-button-div");
  logoutButtonDiv.innerHTML = `
    <button type="button" id="logout-button" >Logout</button>
  `;
  const logoutButton = document.getElementById("logout-button");
  // add an event listener for click events
  logoutButton.addEventListener("click", (e) => {
    // and remove token from localstorage, i.e. logging user out
    localStorage.removeItem("token");
    // then reload the page
    location.reload();
  });
}
There is our basic (and very insecure) approach to user authentication.
Before we move on, we want to create a express middleware that we use to both authenticate a user, and at the same time extract the user object from the database. This way we are able to pass that user object around between our soon to be CRUD functions.
In our server.js file we add the following code snippet, just before our routes:
// this is the standard way of writing express middleware that we can add to our routes
// as you can tell, we pass the same arguments as to our routes, with an additional one: "next"
// the "next" argument is the next function to be called in the request-response cycle
// "passing on" whatever we want to program in this function, our middleware
async function auth(req, res, next) {
  // check if authorization header is available
  if (!req.headers.authorization) {
    // return error message if not
    return res.status(400).send("Missing Authentication Header!");
  }
  // initiate empty user variable
  let user;
  try {
    // try to extract the user data from our token
    user = await validateToken(req.headers.authorization);
  } catch (e) {
    // send error message if it fails
    return res.status(400).send("Invalid Authorization Token!");
  }
  try {
    // then try to fetch the corresponding user object from our database
    user = await userCollection.findOne({
      _id: new ObjectId(user._id),
      email: user.email,
    });
  } catch (e) {
    // else log the error and send a error message
    console.error(e)
    return res.status(500).send("Internal Server Error!");
  }
  // this is where we attach our user object to the current request
  // before we pass it on to the next function in the request-response cycle
  // this allows us to fetch it with "req.user" in our routes
  req.user = user;
  // pass it on
  next();
}
Now we are done with our simple authentication logic. Next we add the CRUD operations for our phone book contacts functionality. Later we add the phone functions, including calling and sending SMS.
Adding contacts CRUD:
Now we add the CRUD logic to our project. We start with adding our express routes, take notice to our newly created middleware inside each contacts route.
In our server.js file we add the following code using the REST approach, i.e. different routes, and with different HTTP methods to represent the different actions to take:
// we will write these functions in the next step
import {
  contacts,
  createContact,
  deleteContact,
  getContact,
  editContact,
} from "./controllers/contactController.js";

// route to get all contacts for logged in user
app.get("/contacts", auth, contacts);
// get specific contact for logged in user
app.get("/contacts/:id", auth, getContact);
// create contact for logged in user
app.post("/contacts/create", auth, createContact);
// update contact for logged in user
app.put("/contacts/edit/:id", auth, editContact);
// delete contact for logged in user
app.delete("/contacts/delete/:id", auth, deleteContact);
Then write the logic inside our contactController.js file. We write all the logic to handle our CRUD operations, including “C"reating, “R"eading, “U"pdating, and “D"eleting a contact object to and from our database:
// import the ObjectId object from mongodb
// we use this to convert strings to correct format for our database
import { ObjectId } from "mongodb";
// import our contact collection
import { contactCollection } from "../services/db.js";

// function to get all contacts for logged in user
export async function contacts(req, res) {
  try {
    // fetch all the users contacts from database
    const userContacts = await contactCollection
      // notice that we use the ObjectId
      // and notice that we use our user object from the request
      // that we made happen in our middleware
      .find({ userId: new ObjectId(req.user._id) })
      // and that we convert the returned "Cursor" object to a JavaScript array
      .toArray();
    if (userContacts) {
      // if there is contacts we return them to client
      return res.send(userContacts);
    } else {
      // if not send empty response
      return res.status(204).send();
    }
  } catch (e) {
    // otherwise log any error and return error message
    console.error(e);
    return res.status(500).send("Internal Server Error!");
  }
}

// function to get specific contact for logged in user
export async function getContact(req, res) {
  try {
    // try fetch the contact from db and send to client
    const contact = contactCollection.find({
      userId: new ObjectId(req.user._id),
      _id: ObjectId(req.params),
    });
    // return the contact
    return res.status(200).send(contact);
  } catch (e) {
    // send error message if fails
    console.error(e);
    return res.status(500).send("Internal Server Error!");
  }
}
// function to create contact for logged in user
export async function createContact(req, res) {
  try {
    // try insert a new contact entry to database with our received form data
    const formData = req.body;
    await contactCollection.insertOne({
      name: formData.name,
      number: formData.number,
      // we connect the contact with our user using the user._id
      // this way we can filter our database queries on the user._id
      userId: new ObjectId(req.user._id),
    });
    // return successful response
    return res.status(201).send();
  } catch (e) {
    // else log error and return error message
    console.error(e);
    return res.status(500).send("Internal Server Error!");
  }
}
// function to update contact for logged in user
export async function editContact(req, res) {
  try {
    // extract received form data
    const formData = req.body;
    // update the specific contac using mongodb update filter and document:
    // https://www.mongodb.com/docs/drivers/node/current/crud/update/modify/#example
    await contactCollection.updateOne(
      // first argument is our filter object
      { _id: new ObjectId(req.params), userId: new ObjectId(req.user._id) },
      // second is our $set object with the data to change
      {
        $set: {
          name: formData.name,
          number: formData.number,
        },
      }
    );
    // return successful response
    return res.status(201).send();
  } catch (e) {
    // else log error and return error message
    console.error(e);
    return res.status(500).send("Internal Server Error!");
  }
}
// function to delete contact for logged in user
export async function deleteContact(req, res) {
  try {
    // delete the specific contact
    await contactCollection.deleteOne({
      _id: new ObjectId(req.params),
      userId: new ObjectId(req.user._id),
    });
    // return successful response
    return res.status(204).send();
  } catch (e) {
    // else log error and return error message
    console.error(e);
    return res.status(500).send("Internal Server Error!");
  }
}
Finally we add the client logic to our contact.js file:
// check if user is logged in
const token = localStorage.getItem("token");
// if user logged in show the contact forms and contact list
if (token) {
  // fetch the outer div to insert our form into
  const contactFormDiv = document.getElementById("contact-form-div");
  // create and insert the form to create contacts
  contactFormDiv.innerHTML = `
  <form action="post" id="create-contact-form">
    <h3>Create Contact:</h3>
    <label for="create-contact-name">Contact Name</label>
    <input type="text" name="create-contact-name" id="create-contact-name">
    <label for="create-contact-number">Contact Number</label>
    <input type="text" name="create-contact-number" id="create-contact-number">
    <input type="submit" value="Save Contact">
  </form>
  `;
  // fetch the newly created form
  const createContactForm = document.getElementById("create-contact-form");
  // add event listener and listen to form submission
  createContactForm.addEventListener("submit", async (e) => {
    // prevent default form behaviour
    e.preventDefault();
    // fetch the contact name
    const createContactName = document.getElementById(
      "create-contact-name"
    ).value;
    // fetch the contact number
    const createContactNumber = document.getElementById(
      "create-contact-number"
    ).value;
    // send a request to the API including our token and correct HTTP method
    const createResponse = await fetch(
      "http://localhost:3000/contacts/create",
      {
        // to create we use the "post" method
        method: "post",
        headers: {
          // this is where we add our token
          Authorization: token,
          "content-type": "application/json",
        },
        // convert the form input values to json
        body: JSON.stringify({
          name: createContactName,
          number: createContactNumber,
        }),
      }
    );
    if (createResponse.status === 201) {
      // if the response is successful we display a success message
      alert("Contact created!");
      // and reload the page
      location.reload();
    } else if (createResponse.status === 500) {
      // else display error message
      alert("Something's wrong, try again!");
    }
  });

  // this is our logic to fetch all contacts and display them
  // fetch the outer div to place the contact elements inside
  const contactsDiv = document.getElementById("contacts-div");
  // make a request to the API including token and correct HTTP method
  const res = await fetch("http://localhost:3000/contacts", {
    // we use tht "get" method when we only fetch data
    method: "get",
    headers: {
      // we still need the token to only fetch the current users data
      Authorization: token,
    },
  });
  // if successful
  if (res.status === 200) {
    // if the request is successful we extract the received data to JavaScript
    const contacts = await res.json();
    // we check if there is any contact objects available
    if (contacts) {
      // then loop over the objects and apply them to individual elements
      // elements including edit and delete buttons
      contactsDiv.innerHTML += contacts.map(
        (contact) =>
          `
          <div class="contact-card">
            <p class="contact-card-name">
              Name: <input type="text" id="contact-edit-name-input-${contact._id}" value="${contact.name}">
            </p>
            <p class="contact-card-number">
              Number: <input type="text" id="contact-edit-number-input-${contact._id}" value="${contact.number}">
            </p>
            <button class="contact-edit-button" data-contact-id="${contact._id}">Edit</button>
            <button class="contact-delete-button" data-contact-id=${contact._id}>Delete</button>
          </div>
        `
      );
    }
    // we then add contact edit and delete logic, first the edit logic
    // we fetch all edit buttons
    const contactEditButtons = document.querySelectorAll(
      ".contact-edit-button"
    );
    // then we add event listeners to each one
    contactEditButtons.forEach((button) => {
      // we listen for the click event
      button.addEventListener("click", async (event) => {
        // prevent the default behaviour
        event.preventDefault();
        // then fetch the contact id from the buttons data attribute
        // https://developer.mozilla.org/en-US/docs/Web/HTML/How_to/Use_data_attributes
        const contactId = button.dataset.contactId;
        // fetch edit form inputs for name
        const contactEditNameInput = document.getElementById(
          `contact-edit-name-input-${contactId}`
        );
        // and for number
        const contactEditNumberInput = document.getElementById(
          `contact-edit-number-input-${contactId}`
        );
        // make request to the edit route with token and correct HTTP method
        console.log(`http://localhost:3000/contacts/edit/${contactId}`);
        const res = await fetch(
          // we provide the contact id to the route
          `http://localhost:3000/contacts/edit/${contactId}`,
          {
            // we use the "put" method when editing an object
            method: "put",
            headers: {
              // include token
              Authorization: token,
              "content-type": "application/json",
            },
            // and convert data to json
            body: JSON.stringify({
              name: contactEditNameInput.value,
              number: contactEditNumberInput.value,
            }),
          }
        );
        if (res.status === 201) {
          // if successful we display success message
          alert("Contact edited!");
          // and reload the page
          location.reload();
        } else {
          // else error message
          alert(res.text());
          // and reload the page
          location.reload();
        }
      });
    });
    // delete logic: almost same as edit
    // we fetch all delete buttons
    const contactDeleteButtons = document.querySelectorAll(
      ".contact-delete-button"
    );
    // add event listeners
    contactDeleteButtons.forEach((button) => {
      // also listen for click events
      button.addEventListener("click", async (event) => {
        // prevent default behaviour
        event.preventDefault();
        // extract contact i from button data attribute
        // https://developer.mozilla.org/en-US/docs/Web/HTML/How_to/Use_data_attributes
        const contactId = button.dataset.contactId;
        // send request with token and correct HTTP method
        const res = await fetch(
          // also include the contact id
          `http://localhost:3000/contacts/delete/${contactId}`,
          {
            // this time we use the "delete" HTTP method
            method: "delete",
            headers: {
              Authorization: token,
              "content-type": "application/json",
            },
          }
        );
        if (res.status === 204) {
          // on success we display success message
          alert("Contact deleted!");
          location.reload();
        } else {
          // else display error message
          alert(await res.text());
          location.reload();
        }
      });
    });
  // if the user does not have any contacts yet, we display a friendly message
  } else if (res.status === 204) {
    contactsDiv.innerHTML = `
      <p>You have no contacts</p>
    `;
  }
} else {
  // and if the user is not logged in we display another friendly message
  const phonePageContent = document.getElementById("phone-page-div");
  phonePageContent.innerHTML = `
    <h1>Login to use the phone book</h1>
  `;
}
Now you should have a working CRUD application to signup users and allow them to create contacts to their phone book. The next step is to use a third party API to make our phone application handle calls and text messages.
Adding phone functionalities:
We begin with adding the functionality to send text messages. To start of, signup for 46elks . After the completed signup, you’ll be able to fetch your credentials from the account page. Inside your backend project, create a .env file and insert your 46elks credentials, we also add our sending name:
# The 46Elks username
ELKS_USERNAME=Your46ElksUsername
# The 46Elks password
ELKS_PASSWORD=Your46ElksPassword
# The sending name displayed to our receivers
ELKS_SENDER=WebPhone
Install the dotenv package:
npm i dotenv
And import it at the top of your server.js file, just below the imports:
import "dotenv/config";
Create the route for the SMS function inside the server.js file:
// route to send sms to logged in user contact
app.post("/sms/send", auth, sendSMS);
Now we add the function for sending SMS inside our phoneController.js file.
We follow the 46Elks documentation (make sure to choose the Node.js example code), with some slight adjustments to use the js module code style and async/await:
// import the 46Elks credentials and sender name from our .env file
const username = process.env.ELKS_USERNAME;
const password = process.env.ELKS_PASSWORD;
const sender = process.env.ELKS_SENDER;
// create a base64 string with the credentials
const auth = Buffer.from(username + ":" + password).toString("base64");

// function to send SMS to a logged in users contact
export async function sendSMS(req, res) {
  // we receive the contact id, and the messge to send from our client
  const formData = req.body;
  const contactId = formData.contactId
  const message = formData.message;
  // we fetch the contact from our database
  const contact = await contactCollection.findOne({
    _id: new ObjectId(contactId),
  });
  // we create the data object to send to 46Elks
  let data = {
    // our sender name
    from: sender,
    // the contact number
    to: contact.number,
    // the message
    message: `Hello ${contact.name}, Here is your message: ${message}`,
    // you could use dryrun to test the functionality without sending a real SMS
    // dryrun: "yes",
  };
  // create a URL Search Params object with the data
  // https://developer.mozilla.org/en-US/docs/Web/API/URLSearchParams
  data = new URLSearchParams(data);
  // then convert it to a string
  data = data.toString();
  // we try send the message through the 46Elks API
  try {
    // send it to the 46Elks API
    const response = await fetch("https://api.46elks.com/a1/sms", {
      method: "post",
      headers: {
        // make sure to add the credentials header
        Authorization: "Basic " + auth,
      },
      // and the data to send
      body: data,
    });
    // we check the status code of our repsonse
    if (response.status === 200) {
      // then extract the json object
      const responseJSON = await response.json();
      // in this simple case, we make sure it has one of the following statuses
      if (
        responseJSON.status === "created" ||
        responseJSON.status === "sent" ||
        responseJSON.status === "delivered"
      ) {
        // we add our logged in user id to the response json object
        responseJSON.userId = req.user._id;
        // we also add the contact id to the response json object
        responseJSON.contactId = contact._id;
        // then we simply add the response json object to our databse collection
        await smsCollection.insertOne(responseJSON);
        // and return a successful status code and message to the client
        return res.status(200).send("Message sent and saved to history!");
      } else {
        // if the repsonse status from 46Elks is non of the above, we log error
        console.error("46Elks failled to send message: ", responseJSON);
        // and return a error message to the client
        res
          .status(500)
          .send(
            "Unable to send the text message, try again or contact support!"
          );
      }
    } else {
      // if the response itself failed, we log error
      console.error("Failed to send message: ", response);
      // and send error message to the client
      return res.status(500).send("Failed to send message!");
    }
  } catch (e) {
    // If everything fails we log error
    console.error(e);
    // and send error message to the client
    return res.status(500).send("Internal Server Error!");
  }
}
Now we add the client code to our frontend project. We want to add a message input, send message button, as well as a list of all sent message to specific contact.
First we add the message input just below our contact number input:
<p class="contact-sms-message">
  Message: <textarea id="contact-sms-message-input-${contact._id}"></textarea>
</p>
Then add the send message button below the edit and delete button:
<button class="contact-sms-button" data-contact-id=${contact._id}>Send SMS</button>
We add the element that will contain the list of sent SMS below the send SMS button:
<div id="contact-sms-list-div-${contact._id}"></div>
Now we can add the related client JavaScript code to send and display messages.
We add this to our contact.js file to fetch all the send SMS buttons from the DOM and add event listeners:
// fetch all send SMS buttons from the DOM
const smsButtons = document.querySelectorAll(".contact-sms-button");
// loop over each button
smsButtons.forEach((button) => {
  // add event listeners listening for the click event
  button.addEventListener("click", async (event) => {
    // prevent any default behaviour
    event.preventDefault();
    // fetch the message from the message input field element
    // notice .value which fetches the actual value from the input element
    const smsMessage = document.getElementById(
      `contact-sms-message-input-${button.dataset.contactId}`
    ).value;
    // then we send the SMS with a function we create inside our phone.js file
    await frontendSendSMS(token, button.dataset.contactId, smsMessage);
  });
});
Inside our phone.js file we create the frontendSendSMS function, make sure to import this function inside the contact.js file:
// frontend function to send SMS
// we take the current logged in users token, the contact id, and the message
export async function frontendSendSMS(token, contactId, message) {
  // we send the data back to our API that will forward it to the 46Elks API
  const res = await fetch("http://localhost:3000/sms/send", {
    method: "post",
    headers: {
      // we make sure to include our user credentials
      Authorization: token,
      // and specify the correct data type
      "content-type": "application/json",
    },
    // we format our data
    body: JSON.stringify({
      // including the contact id
      contactId: contactId,
      // and message
      message: message,
    }),
  });
  // if the request is successful
  if (res.status === 200) {
    // we display the success message
    alert(await res.text());
    // and reload the page
    location.reload();
    // history knapp att se skickade sms
  } else {
    // otherwise we display the error message
    alert(await res.text());
    // and reload the page
    location.reload();
  }
}
Now that we are able to send our messages we want to display them for each contact.
We stay inside our phone.js file and add the following code:
// frontend function to list all sms per logged in user contacts
// we take the current logged in users token, and the contact id
export async function frontendListAllContactSMS(token, contactId) {
  // fetch the SMS list container element we already created in our contact card
  const smsDiv = document.getElementById(`contact-sms-list-div-${contactId}`);
  // then send the request to fetch all the contacts SMS
  const res = await fetch(`http://localhost:3000/sms/${contactId}`, {
    method: "get",
    headers: {
      Authorization: token,
    },
  });
  // if the response is successful
  if (res.status === 200) {
    // we fetch the response json data
    const contactSMSList = await res.json();
    // and map it to the SMS container
    smsDiv.innerHTML += contactSMSList.map(
      (sms) => `
            <div>
                ${sms.message}
            </div>
        `
    );
  } else {
    // else show a message saying contact does not have any SMS
    smsDiv.innerHTML = "<p>There is no SMS for this contact</p>";
  }
}
We add the function call to our contact.js file, just below the SMS button logic:
// loop over each contact
contacts.forEach((contact) => {
  // fetch and list all the contacts SMS
  frontendListAllContactSMS(token, contact._id);
});
The last thing to add to our project is functionality to make phone calls.
We use the 46elks official documentation available on their website.
The function will call a contact and play a sound as they answer.
This is the sound we use, it is the Chinese Rap meme song. You could either download it yourself and host it on a vercel application using express to serve the mp3 file, or you could use this link. It need to be online for 46elks to be able to use it for the phone call.
We then assign a phone number to our 46elks account to use for our phone calls, you assign phone numbers in your account page, the credit of your account should cover the cost of 30SEK.
Let’s create a route in our server.js to make phone calls:
// function to make prank calls to a logged in users contact
app.post("/call/prank-call", auth, makePrankCall);
Now we create the controller function in phoneController.js:
// express controller function to prank call our friends
export async function makePrankCall(req, res) {
  // get formData from request object that contains the contactId
  const formData = req.body;
  // fetch contact from database using contactId from formData
  const contact = await contactCollection.findOne({
    _id: new ObjectId(formData.contactId),
  });
  // create 46elks API data object with info to send to their API
  // https://46elks.se/docs/make-call
  let data = {
    // our newly assigned account number that makes the call
    // make sure to add your own, this is a dummy number
    from: "+46700000001",
    // the contact number that receives the call
    to: contact.number,
    // functions to run on accepted call, i.e. someone answered
    voice_start: JSON.stringify({
      // set to record the call, and the endpoint to receive the recording
      // we could host an endpoint on our vercel app, or just fetch it from 46elks
      // in this example we fetch it from 46elks after it is made
      recordcall: "https://46elks.vercel.app/recordings",
      // set to play audio, stored at specified location (our vercel app)
      play: "https://46elks.vercel.app/mp3",
    }),
  };
  // format data object into URL search params, to send to 46elks API
  data = new URLSearchParams(data);
  // also convert into a string
  data = data.toString();
  // we then try send the request to 46elks API
  try {
    const response = await fetch("https://api.46elks.com/a1/calls", {
      // with the HTTP POST method
      method: "post",
      // including our API credentials
      headers: {
        // we created them at the top of the file in a earlier step
        Authorization: "Basic " + auth,
      },
      // add the formatted data object
      body: data,
    });
    // extract the fetch response json object
    const responseJSON = await response.json();
    // validate that our response was successful
    // the different cases are available in their API examples
    if (responseJSON.state === "ongoing") {
      // we then return a success message to the client
      return res
        .status(200)
        .send("You have successfully prank called your contact!");
    } else {
      // otherwise log the response for troubleshooting
      console.error(responseJSON);
      // and return a error message to the client
      return res.status(500).send("Prank call unsuccessful, try again!");
    }
  } catch (e) {
    // if any other errors, we log them and return a error message to the client
    console.error(e);
    return res.status(500).send("Internal Server Error!");
  }
}
Now we create the client code for our phone call function
We need to add a button to each contact card, and attach a event listener to each one of them, and on the click event we send a request to our backend with the contact id.
Add the button element to the contact card HTML code:
<button class="contact-prank-call-button" data-contact-id=${contact._id}>Prank Call</button>
Fetch all buttons, loop over them, and add event listeners:
// fetch all the buttons from the DOM using the class attribute
const prankCallButtons = document.querySelectorAll(
  ".contact-prank-call-button"
);
// use the forEach method to loop over each button
prankCallButtons.forEach((button) => {
  // add the event listener, and listen for the click event
  button.addEventListener("click", async (event) => {
    // prevent any default behaviour
    event.preventDefault();
    // then make a call to our soon to be frontend function to initiate calls
    // we pass it the token for our logged in user, and the contact id
    await frontendPrankCall(token, button.dataset.contactId);
  });
});
Frontend function to initiate phone calls:
// frontend function to initiate prank call
// it takes the token for our logged in user, and the contact id
export async function frontendPrankCall(token, contactId) {
  // make a fetch call to our backend endpoint
  const res = await fetch("http://localhost:3000/call/prank-call", {
    // using the HTTP POST method
    method: "post",
    headers: {
      // add our logged in user token
      Authorization: token,
      // set the content type to json
      "content-type": "application/json",
    },
    // format the contact id into json object
    body: JSON.stringify({
      contactId: contactId,
    }),
  });
  // either case, we want to display the message
  alert(await res.text());
  // and reload the page
  location.reload();
}
First try the function to call your own phone, if it works you should hear the song playing, and you should after the call be able to find the recording at your 46elks account under the logs section.
If everything works out, it is time to prank your friends!🤪